Sunday, September 22, 2013

Birthday Wishes

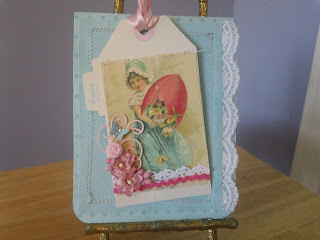
I made this card for a friend who is celebrating a birthday (a rather significant birthday!).  She is definitely not a day over 29 (again).  I wanted to make her a special card for the occasion. She likes pink so I made sure to incorporate plenty of shades of pink on this card.

I used the Pink Paislee London Market 6x6 paper pad (one of my favorite paper collections), some lace from Hobby Lobby, a pink grosgrain ribbon from Martha Stewart Crafts and die cut frame (I made this card about a month ago and cannot remember the die I used for that frame).  I also used the Spellbinders Decorative Labels 8 die to cut Papertrey Ink Sweet Blush card stock to back the frame.  I had to cut two of these frame backs and piece them together because one die cut was not wide enough to back the frame.  I don't think it shows where I did that.

The card base is cut from a piece of Rustic Cream card stock by Papertrey Ink.  The image in the frame is from a CD of ephemera that I purchased on ebay about 6 years ago.  If you do a search on ebay you can still find CDs of ephemera.  These images are such fun to print out and use on cards and projects.

On the inside of the card I cut a Spellbinders Classic Rectangle out of Papertrey Ink Sweet Blush card stock and used the rest of the Spellbinders Decorative Labels 8 piece to give a decorative edge to the rectangle.  I stamped a happy birthday sentiment and added a bling flourish to complete the card.

The card measures 4.25 x 5.5 inches and is a side fold card.
Thanks for visiting my blog!

Monday, September 2, 2013

Letterpress Madness...

I recently purchased the Lifestyle Crafts Letterpress Starter Kit on clearance at Hobby Lobby.  I have always been a fan of letterpress cards, but had never tried to craft my own.  When I saw this kit on clearance, I decided to give it a go.

The kit comes with black letterpress ink and a few letterpress plates so it does contain everything needed to get started.  While I know I will use the black ink that comes in the kit, I did want to expand my color choices.  One look at the price per tube - $6 on Amazon.com - had me rethinking that desire.

Before I had even opened the starter kit box, I was back to Hobby Lobby to find some letterpress ink at a more affordable price.  I found some Speedball Block Printing Ink.  This is a thick, sticky ink that is very much like the ink used in letterpress. The price per tube is $6.99 but you get 2.5 ounces compared to One ounce of the Lifestyle Crafts Letterpress ink.  You get a lot more for your money buying the Speedball ink and I used a 40% off coupon at Hobby Lobby that brought the price to just a little over $4 per tube. Much better.  Then, I happened to be at Michael's picking up some resin and I browsed the clearance aisle and found 12 different colors of the Speedball ink for $2.48 each. But wait- it gets better - clearance items were an ADDITIONAL 50% off so I was able to buy each tube of ink for $1.24!!!  Score!!!!!!

Okay - so I also ran to Joann's this weekend and found seven of the Lifestyle Crafts Letterpress Plate kits for $2.97 each (one of the kits was $5.97). The cheapest I have been able to find them online was $15.  I was so excited to find the plate kits at such a great price that I was almost jumping for joy in the store aisle.

Now, onto the paper needed to letterpress.  The kit came with several sheets of the letterpress paper which is a thick, soft paper.  It is really a nice quality, but again, not cheap.  I wanted to experiment with other papers I had on hand to see if they would letterpress well.   I used a Canson Watercolor paper, the Lifestyle Crafts letterpress paper that came in the kit and a piece of Pure Poppy card stock by Papertrey Ink.

The best impression was achieved with the Lifestyle Crafts Letterpress paper (no surprise here). The Canson Watercolor Paper (purchased at Hobby Lobby some time ago) was a close second.  I misted the Canson paper with water and let it dry a bit before letterpressing to soften it up a bit.  I did like the results with this paper.  The Papertrey Ink card stock did not letterpress as well.  It looks nice but there is not very much de-bossing on this paper.   I may need to add another shim and see how that works.

The photo of the silver Christmas tree is letterpress with the Lifestyle crafts paper.

The damask design at left is letterpress with the Canson watercolor paper.

I also included a photo of the Canson watercolor paper  (on the left) and Lifestyle Crafts letterpress paper (on the right) side-by-side so you can compare.  It is hard to get a sense of the quality in photos and I am planning to do a video on this soon.

And lastly, below is a photo of letterpress on the Pure Poppy card stock from Papertrey Ink.

Using the kit is a lot of fun and I am planning to make some letterpress holiday cards.  This craft can be a little messy so make sure you have plenty of wet wipes on hand for clean up.

Thanks for visiting my blog.

Monday, August 12, 2013

Masculine Thank You Card

Masculine cards are always a little challenging for me to create.  I would much rather make a card with lots of frills, flowers, lace and other embellishments in a variety of soft pastel colors.  That recipe obviously won't do for a masculine card.

I recently needed a masculine thank you card and thought about using one of the cork embellishments I cut a few weeks ago.  I selected one of the cork tags for this card and stamped a border design on it using Saddle Brown Staz On ink.  The Staz On ink stamps beautifully on the cork.   Stars are usually my go to motif for masculine cards, but this time I decided to use some geometric stamps to decorate my card base.  Not one star on this masculine card - yeah me for using something other than stars on a masculine card!

I used another cork tag for my cardlift video on YouTube last week.  This one slipped into a pocket on the front of the card.  You can watch that video HERE.


Thank You Card Materials:

Papertrey Ink Rustic White card stock
Inkadinkado Clear Stamp Thank You Words
Arrow and Zig-Zag Border from the My Mind's Eye Indie Chic Ginger Pictures stamp set
TPC Studios Dots and Stripes (border stamp used on the cork tag)
Cuttlebug Embossing Folder (I don't know what this one is called)
Fancy Pants Summer's End patterned paper
Spellbinders Labels 21
Spellbinders Standard Circle Die (1 3/4 inch size)
1 1/8 Inch Circle Punch
Saddle Brown Staz On Ink
Button
Twine


Wednesday, July 24, 2013

Cork Anyone?......

I really like to add texture to my cards and have done so using wood veneer and other materials for quite some time now.  Cork was the next material on my list to add to projects and I set about looking for cork thin enough to die cut. A few weeks ago I was browsing at Hobby Lobby and found a huge roll of self adhesive cork.  Eureka!!...PERFECT.

90 minutes and many cranks of the Sizzix Big Shot later I had a lovely pile of cork embellishments!  Large tags, small tags, circles, ovals, rectangles, arrows, hearts, flourishes and on and on.  I have not yet made a card using these embellishments, but will be doing so soon.  Right now - I just like to look at all this cork goodness.

When cutting out the cork shapes I also cut a corresponding shape in light weight chipboard and glued each of the cork embellishments to the chipboard to make them a little sturdier.  Even though the cork was self adhesive, the adhesive was not strong enough to work in my humid climate.  A little Scotch Quick Dry glue applied to the back of each of the cork shapes solved that problem.

Aren't these cork embellishments fun?


Friday, July 19, 2013

The Christmas Card Making Countdown Has Begun!

Yes, I know it is still July, but that is when I have to start making cards in order to get them all finished before the holidays.  Anyone who makes holiday cards knows exactly what I am talking about.  I don't tend to make cards in bulk - meaning I make two or three cards in the same or similar design and then move on to another design.

So let's see - it is July 18 and I have exactly two holiday cards made.  I have quite a few more to make  (I don't even want to verbalize the number because when I think about how many still need to be made I get a little panicky), but I usually have other projects in the works so holiday card making gets squeezed in between other projects at least until mid October. When October rolls around, I really ramp up production.  At this point full blown panic usually sets in when I realize that cards need to be made and mailed in 6 or 7 weeks time.  One way or another it all gets done and I enjoy making my own cards.  At this point if I purchased a card to send/give to a friend or relative, they would be highly insulted becausethey enjoy receiving handmade cards from me.

Here are the two cards that are completed. They are the same design - the only difference is that one of the trees has silver enamel dots on it and the other has burgundy enamel dots.


Materials used on these cards include:

Papertrey Ink Kraft card stock
Papertrey Ink Fine Linen card stock 
Basic Grey basics notebook paper patterned paper
My Favorite Things Insert It 3x4 Notebook Paper
Sizzix Framelits Snowman Die and Stamp Set
Handmade Enamel Dots
Craft Store clear gems
Sentiments Stamps from The Paper Company Studio Vintage Christmas stamp set
EK Success Small Snowflake Punch
Rock Candy Glitter

Sunday, July 7, 2013

Late to the Party......


I am definitely not the type to join the the party on trends willy nilly, but I have to say I am late to the party on the chalkboard trend. It seemed to me that chalkboard embellishments were better suited to school themed layouts and teacher appreciation cards - neither of which I make.

These embellishments also seemed at bit pricey ($3.99 or $4.99 for five chalkboard embellishments).  Anyone who follows my YouTube channel (47CMC) and/or this blog knows that I like to make my own embellishments whenever possible.  I decided to join the party on the chalkboard trend and attempt to make some of these chalkboard pieces to use on cards.

After purchasing wood square and rectangle pieces at the craft store, I used some painter's masking tape to first paint a "wood frame" around the perimeter of the wood piece.  After that was dry, I masked off the frame area and painted the center of the piece with black chalkboard paint.  This is very easy, but takes a little while as you wait for the paint to dry.

The photo above shows a few of the chalkboard pieces I made.  I still need to touch these up with the brown paint to cover some of the chalkboard paint that seeped under the tape before I use them on a project.  They are fun to make and pretty easy and if you go sparingly on the paint it will be less likely to seep under masked off areas.

Here is a card I made using one of my handmade chalkboard embellishments.


Materials used on this card:

Handmade chalkboard embellishment
Handmade enamel dots
Summer's End patterned paper by Fancy Pants
Kraft card stock by Papertrey Ink
Smokey Shadow card stock by Papertrey Ink
Ruled background stamp by Cornish Heritage Farms
Wooden heart by Studio Calico
Fishtail Flags banner dienamics by My Favorite Things

Monday, June 24, 2013

Graduation Card


I have been MIA from the blog lately.  Sometimes it seems hard to get the time to sit down and blog about my creations when my creations are nonexistent because I don't have time to get into the craft room.  I do get antsy when I don't have time to create and I feel incomplete if I don't have a creative project or two or three in the works.  My grandmother (Loretta) was like that -  always making something-  and I inherited that passion to create from her.

I was able to get a card made this weekend. This one is long overdue and is for my nephew who graduated from high school.  Although the card is a little late, I hope that he will like it.

The materials used on this card include:

Papertrey Ink card stock in Smokey Shadow
Craft store white card stock
Paper Studio - graduation patterned paper
Craft store silver star sequins
Craft store bling
Recollections graduation themed dimensional stickers
TPC Studio Congrats and Wishing You Great Success stamps (purchased at Hobby Lobby)
2013 Thickers by American Crafts in the font called Flakey
Fishtail Flags Dienamics die by My Favorite Things

A fairly simple card, but I think it looks festive and congratulatory!

Thanks for visiting my blog.


Sunday, June 2, 2013

Quick Update


I wanted to post a quick update to the last post to list the dies I used on the Card For A Friend I posted.


The square die I used on the outside and the inside of the card is from a Spellbinders Marvelous Squares die set. The Large flourish on the inside was cut with a Cheery Lynn Designs Victorian Romance Flourish die. The Flourish on the left outside of the card was cut with a Hero Arts Fancy Dies Flourish

Let me know if you have any questions!


Friday, May 24, 2013

Card for a Friend


I made this card for a friend to thank her for a lovely gift package she recently sent to me.  I hope she likes it.

It really made me happy to use soft pinks and off whites to make this card.  I also incorporated a few handmade embellishments including the resin cameo, small resin roses (bottom right of the card) and organza flower (top left of the card).  I used some Prima Say It in Pearls, I Am Roses mulberry paper flowers and cut some flourishes out of pink vellum (you can't go wrong with pink vellum!).

The bow was made using pink seam binding.  I wanted the bow to stay puffy even in transit through the mail so I arranged the loops of the bow, stuffed some wax paper in the loops and coated the loops with Stiffy fabric stiffener.  This process made the loops a little translucent, but I did not mind.  The card base is Sweet Blush card stock from Papertrey Ink and the patterned paper is London Market by Pink Paislee. The butterflies were stamped with VersaMark ink and embossed with white embossing powder. The white looked a little stark against the soft pinks of this card so I took a soft pink copic marker and lightly colored over each butterfly.  I think that covers it!

Now the challenge is to get to the post office so I can send this card off to my friend.

Have a great weekend and thanks for visiting my blog!

Friday, May 10, 2013

Happy Mother's Day Card


I loved making this Mother's Day card for my Mom.  Soft pastels are some of her favorite colors.   It was so much fun using a Sizzx/Hero Arts stamp and die set for the flowers and the flourish on the circle.  I also used a Paper Studio swirls embossing folder for one of the layering pieces of Papertrey Ink Aqua Mist card stock.  Aqua Mist is one of my favorite Papertrey Ink colors.

I added some lace and layered Aqua Mist ribbon from Papertrey Ink over that, popped on a bow and button and that was it.  A simple card, but one that I think my Mom will like.

Materials:

Aqua Mist card stock by Papertrey Ink
Aqua Mist ribbon by Papertrey Ink
Lace from my stash
Button from my stash
Hero Arts & Sizzix die/stamp set Floral
Paper Studio (Hobby Lobby) Swirls Embossing folder

Wednesday, May 1, 2013

DIY Enamel Dot Embellishments


If you watch my YouTube channel and/or read this blog on a regular basis, you know that I like to make my own embellishments.  I really love the enamel dots that have been in vogue for awhile now, but I see them in the craft store priced at $3.99 for a package of 10 or so dots.  Even using a coupon - that does not seem like a good buy to me.

I love the look of the enamel dots on cards so I decided to make my own.  It took me awhile to come up with a process that works and looks great.  I recently posted a YouTube mini tutorial on this process here (I say mini tutorial because it is as easy as 123).


The materials you will need include:

Wiggly eyes (googly eyes) - found in the kids section at most craft stores
Nail Polish (I buy the cheap stuff from the Dollar Tree)
Flat Topped Toothpicks (optional)
Glue Dots (optional)
Floral Oasis

Here's what I do to make the dots:  I roll a glue dot and place it on top of the flat topped toothpicks, next I place the wiggly eye on top of the toothpick, then I select a color of nail polish and paint the wiggly eye.  You may need two coats with lighter color nail polishes. That's it. Simple, simple, simple!

The photos show the materials you will need, the toothpicks in the floral oasis with the wiggly eyes painted and drying, and the finished enamel dots - ready to use!

Note: The floral oasis, glue dots and toothpick system just helps me paint the wiggly eyes with the nail polish. It allows me to get all around the wiggly eye and make sure I don't leave any of the surface unpainted. I hold the toothpick while I am painting the wiggly eye with polish and then stick it in the oasis to dry.  Hope this makes sense.

Let me know if you have any questions!

Wednesday, April 17, 2013

Chipboard Embellishments


I was making Easter cards this year and wanted to use some of my vintage images on my cards.  I was
thinking how great it would be if these images were on chipboard.  After giving some thought to how I might transfer these images to chipboard, I decided to try some inkjet iron-on T-shirt transfer paper I had in my stash.  I followed the directions for printing on the paper and then used a hot iron to transfer the image onto the chipboard (following the directions as if I was ironing onto a T-shirt).  It worked like a charm.  You basically just place your transfer paper image facing down onto the chipboard and slowly run the iron over it. One note of caution, you probably want to protect your ironing
board pad so you don't transfer some of the image which might overhang your chipboard piece onto the pad.  Ask me how I know this (yes - I did transfer part of an image onto my ironing board pad!).  If you are worried about your iron you can put a piece of cloth or iron safe paper over the transfer paper.

Here is a card I made using one of my chipboard embellishments.  I also explained the process in a YouTube video here.

Easy peasy!

!

Friday, March 29, 2013

Sizzix Pop N Cuts Cards


Just a quick card share on two Sizzix Pop 'N Cuts cards I made this week.  I have had the Pop 'n Cuts starter die set and Flower die insert for months and had not used them.  I thought the flower die would lend itself well to an Easter card.  Once I made the Easter card - I just had to make another card using the Pop 'n Cuts die.  I really love the results you can get with the Pop 'n Cuts.  I will definitely be using these dies to make more cards.


Cardlift Friday Card


This week's YouTube cardlift featured a design by Daniela Dobson in the April 2013 issue of Cards Magazine.  You can view the YouTube video HERE.  A list of supplies is provided at the end of the video and at the end of this post.

I loved the design of this card, but had a hard time finding a flower in my stash that would work with the card design.  I had one that was the right size, but the wrong color.  Another was the right color, but the wrong size.  It took some time to find something that would work and I finally settled on a silk flower that looked right.

I did not have any enamel dots so I took red, yellow and pink nail polish from the Dollar Tree and painted some flat back pearls to match my card.

This card was slow in coming together and while I was making it I was not sure I was going to like the end product, but I do like this card!

Thanks for visiting my blog.


Materials:

Papertrey Ink Rustic Cream card stock
Papertrey Ink Pure Poppy card stock
Papertrey Ink Sweet Blush card stock
October Afternoon 5 & Dime patterned paper
Papertrey Ink Double-Ended Banner die
My Favorite Things Insert It Insta Frame Dienamics die
Spellbinders Ironworks Accents Die
Flat Back Pearls
Assorted colors of nail polish
Silk Flower
Pink Brad from Hobby Lobby

Wednesday, March 20, 2013

Last Week's Cards


Last week's Cardlift Friday card was a fun one to make.  I was pleased with how it turned out.  I cardlifted a design from Papercrafts Magazine Card Creations Volume 11.  The designer of the card I cardlifted is Kim Kesti.  I could not find just the right butterfly shape in the punches I own - so I cut the butterflies used on the card with my Silhouette.  That is one of the great things about the Silhouette - if you don't have a die cut or punch to make a shape, you can always find what you are looking for in the Silhouette store.  You can view the YouTube video showing how I made this card HERE.

The next card I made was a birthday card for my brother.  His birthday is close to St. Patrick's Day so I made a card for him with a St. Patrick's Day theme.  I used shamrock foam stickers from Michael's and used a Sizzix Movers & Shapers die to cut out the four square windows.  The sentiment on the front and on the inside of the card came from a Papertrey Ink Birthday Basics stamp set.


Thanks for visiting my blog!


Wednesday, March 13, 2013

Tim Holtz Tattered Florals Challenge......


I don't participate in a lot of challenges because I usually have a crisis in confidence that my creation is not "up to snuff" (as my grandmother Loretta used to say).  But, I decided to just go for it and create something for the Tim Holtz Tattered Florals challenge.  Plus, the Tattered Floral die is one of my favorites from Tim Holtz.

This project took me about two weeks to create.  I started by running the die through my Big Shot what felt like 8 zillion times, but was probably more like 12-14 times.  I cut the petals out of grunge paper.  I then base coated the petals on each side in an ivory acrylic paint. After that was done, I added a crackle medium and then a top coat in each of the four colors - light pink, coral, blue and purple.  When that dried I turned each of the petals over and did the same thing.  Then I took out my glue gun and just started manipulating the grunge paper into the flower shape I wanted.  I also took some white stamens I purchased from Michael's (baking aisle) and dipped the tips of these stamens in glue and then in yellow flower soft. After that dried, I painted the stems of the stamens light green.

The leaves were cut with Tim Holtz's Tattered Leaves die out of velvet material taken from some Christmas poinsettias I purchased on sale at the end of the season.  These leaves were ivory in color, but I used Peeled Paint Distress Stain to color them green.

I purchased the basket at Hobby Lobby for $4 and painted it with an off white acrylic paint.  The basket filler is paper shred from the dollar tree.  It was bright yellow, but I used a bleach and water solution to bleach it to an off white.

Whew!  I think that is it.  If you have any questions, please feel free to leave me a comment.  I have a video describing this project on my YouTube channel HERE.  The basket was hard to photograph and you might get a better view of it on the video.

Thanks for visiting my blog!