Monday, June 24, 2013

Graduation Card


I have been MIA from the blog lately.  Sometimes it seems hard to get the time to sit down and blog about my creations when my creations are nonexistent because I don't have time to get into the craft room.  I do get antsy when I don't have time to create and I feel incomplete if I don't have a creative project or two or three in the works.  My grandmother (Loretta) was like that -  always making something-  and I inherited that passion to create from her.

I was able to get a card made this weekend. This one is long overdue and is for my nephew who graduated from high school.  Although the card is a little late, I hope that he will like it.

The materials used on this card include:

Papertrey Ink card stock in Smokey Shadow
Craft store white card stock
Paper Studio - graduation patterned paper
Craft store silver star sequins
Craft store bling
Recollections graduation themed dimensional stickers
TPC Studio Congrats and Wishing You Great Success stamps (purchased at Hobby Lobby)
2013 Thickers by American Crafts in the font called Flakey
Fishtail Flags Dienamics die by My Favorite Things

A fairly simple card, but I think it looks festive and congratulatory!

Thanks for visiting my blog.


Sunday, June 2, 2013

Quick Update


I wanted to post a quick update to the last post to list the dies I used on the Card For A Friend I posted.


The square die I used on the outside and the inside of the card is from a Spellbinders Marvelous Squares die set. The Large flourish on the inside was cut with a Cheery Lynn Designs Victorian Romance Flourish die. The Flourish on the left outside of the card was cut with a Hero Arts Fancy Dies Flourish

Let me know if you have any questions!


Friday, May 24, 2013

Card for a Friend


I made this card for a friend to thank her for a lovely gift package she recently sent to me.  I hope she likes it.

It really made me happy to use soft pinks and off whites to make this card.  I also incorporated a few handmade embellishments including the resin cameo, small resin roses (bottom right of the card) and organza flower (top left of the card).  I used some Prima Say It in Pearls, I Am Roses mulberry paper flowers and cut some flourishes out of pink vellum (you can't go wrong with pink vellum!).

The bow was made using pink seam binding.  I wanted the bow to stay puffy even in transit through the mail so I arranged the loops of the bow, stuffed some wax paper in the loops and coated the loops with Stiffy fabric stiffener.  This process made the loops a little translucent, but I did not mind.  The card base is Sweet Blush card stock from Papertrey Ink and the patterned paper is London Market by Pink Paislee. The butterflies were stamped with VersaMark ink and embossed with white embossing powder. The white looked a little stark against the soft pinks of this card so I took a soft pink copic marker and lightly colored over each butterfly.  I think that covers it!

Now the challenge is to get to the post office so I can send this card off to my friend.

Have a great weekend and thanks for visiting my blog!

Friday, May 10, 2013

Happy Mother's Day Card


I loved making this Mother's Day card for my Mom.  Soft pastels are some of her favorite colors.   It was so much fun using a Sizzx/Hero Arts stamp and die set for the flowers and the flourish on the circle.  I also used a Paper Studio swirls embossing folder for one of the layering pieces of Papertrey Ink Aqua Mist card stock.  Aqua Mist is one of my favorite Papertrey Ink colors.

I added some lace and layered Aqua Mist ribbon from Papertrey Ink over that, popped on a bow and button and that was it.  A simple card, but one that I think my Mom will like.

Materials:

Aqua Mist card stock by Papertrey Ink
Aqua Mist ribbon by Papertrey Ink
Lace from my stash
Button from my stash
Hero Arts & Sizzix die/stamp set Floral
Paper Studio (Hobby Lobby) Swirls Embossing folder

Wednesday, May 1, 2013

DIY Enamel Dot Embellishments


If you watch my YouTube channel and/or read this blog on a regular basis, you know that I like to make my own embellishments.  I really love the enamel dots that have been in vogue for awhile now, but I see them in the craft store priced at $3.99 for a package of 10 or so dots.  Even using a coupon - that does not seem like a good buy to me.

I love the look of the enamel dots on cards so I decided to make my own.  It took me awhile to come up with a process that works and looks great.  I recently posted a YouTube mini tutorial on this process here (I say mini tutorial because it is as easy as 123).


The materials you will need include:

Wiggly eyes (googly eyes) - found in the kids section at most craft stores
Nail Polish (I buy the cheap stuff from the Dollar Tree)
Flat Topped Toothpicks (optional)
Glue Dots (optional)
Floral Oasis

Here's what I do to make the dots:  I roll a glue dot and place it on top of the flat topped toothpicks, next I place the wiggly eye on top of the toothpick, then I select a color of nail polish and paint the wiggly eye.  You may need two coats with lighter color nail polishes. That's it. Simple, simple, simple!

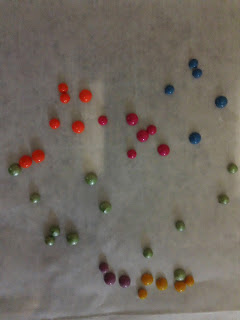
The photos show the materials you will need, the toothpicks in the floral oasis with the wiggly eyes painted and drying, and the finished enamel dots - ready to use!

Note: The floral oasis, glue dots and toothpick system just helps me paint the wiggly eyes with the nail polish. It allows me to get all around the wiggly eye and make sure I don't leave any of the surface unpainted. I hold the toothpick while I am painting the wiggly eye with polish and then stick it in the oasis to dry.  Hope this makes sense.

Let me know if you have any questions!

Wednesday, April 17, 2013

Chipboard Embellishments


I was making Easter cards this year and wanted to use some of my vintage images on my cards.  I was
thinking how great it would be if these images were on chipboard.  After giving some thought to how I might transfer these images to chipboard, I decided to try some inkjet iron-on T-shirt transfer paper I had in my stash.  I followed the directions for printing on the paper and then used a hot iron to transfer the image onto the chipboard (following the directions as if I was ironing onto a T-shirt).  It worked like a charm.  You basically just place your transfer paper image facing down onto the chipboard and slowly run the iron over it. One note of caution, you probably want to protect your ironing
board pad so you don't transfer some of the image which might overhang your chipboard piece onto the pad.  Ask me how I know this (yes - I did transfer part of an image onto my ironing board pad!).  If you are worried about your iron you can put a piece of cloth or iron safe paper over the transfer paper.

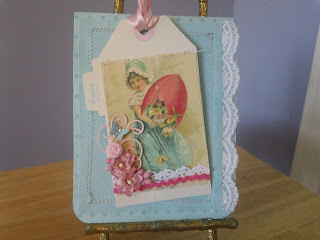
Here is a card I made using one of my chipboard embellishments.  I also explained the process in a YouTube video here.

Easy peasy!

!

Friday, March 29, 2013

Sizzix Pop N Cuts Cards


Just a quick card share on two Sizzix Pop 'N Cuts cards I made this week.  I have had the Pop 'n Cuts starter die set and Flower die insert for months and had not used them.  I thought the flower die would lend itself well to an Easter card.  Once I made the Easter card - I just had to make another card using the Pop 'n Cuts die.  I really love the results you can get with the Pop 'n Cuts.  I will definitely be using these dies to make more cards.